GOM CamUser Guide
Detailed Areas and Editing Tools
1. Clip Area
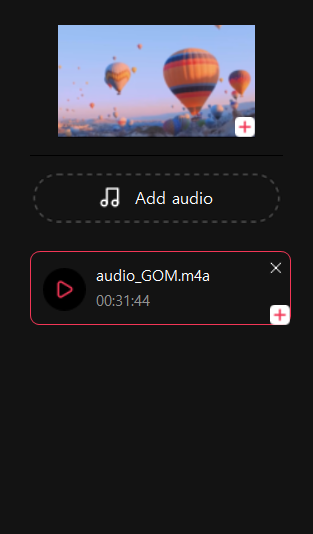
In the clip area, you can check the video clips you have selected for editing in the explorer area and you can import additional audio clips stored on your PC by pressing the [Add Audio] button.

| Video Clip | The selected video clip will appear. Click the [Add  ] button in the lower right corner of the video clip to add the clip to the timeline area. The video clip is added as a video track at the playhead location in the timeline. ] button in the lower right corner of the video clip to add the clip to the timeline area. The video clip is added as a video track at the playhead location in the timeline. |
|---|---|
| Add Audio | The button adds an audio clip. When you click the [ Add Audio] button, the File Explorer window will appear and you can import audio clips stored on your PC. Add Audio] button, the File Explorer window will appear and you can import audio clips stored on your PC. |
| Audio Clip | It loads an audio clip. If you click the [Add  ] button in the lower right corner of the audio clip, the clip will be added to the timeline area. The audio clip is added as an audio track at the playhead location in the timeline. You can click the [Delete ] button in the lower right corner of the audio clip, the clip will be added to the timeline area. The audio clip is added as an audio track at the playhead location in the timeline. You can click the [Delete  ] button to delete the imported clip. ] button to delete the imported clip. |
2. Preview Area
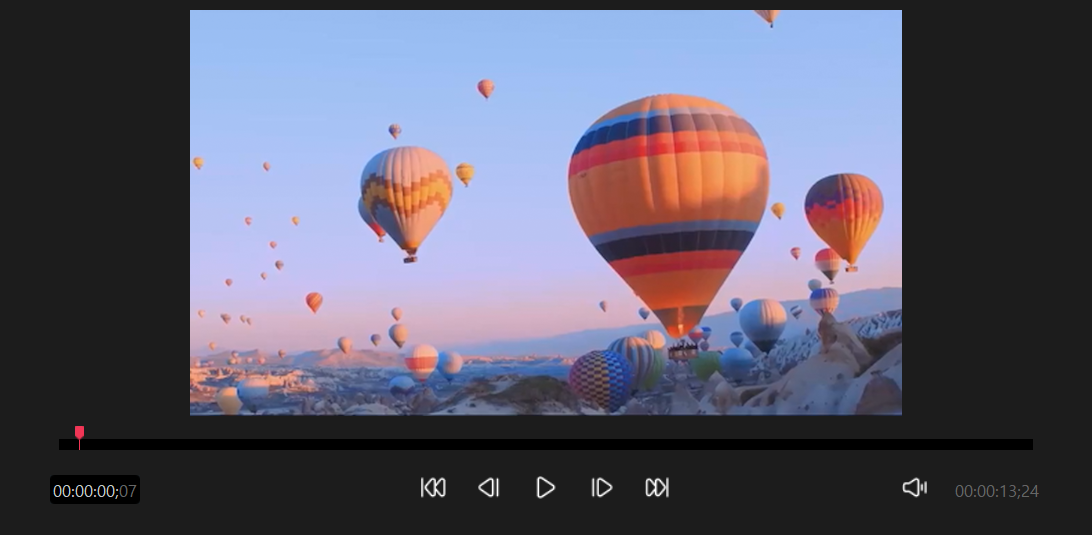
The preview area is a monitor screen where you can preview and listen to added video or audio clips, or view edited clips in the timeline. The preview screen is exposed at a lower resolution than the set resolution due to memory efficiency, thus the image quality may be degraded.
The preview area offers clip modes and timeline modes, which automatically switch between the two, depending on your editing status.
(1) Clip Mode
This mode allows you to monitor the video or audio clip in the clip area as it is.
(2) Timeline Mode
It previews the edited clips in the timeline. You can use it to check the results of your edits.
(3) Preview Monitor Window Button Function

Clip Playhead

|
A playhead that points to where the clip is being played. In Timeline mode, the preview playhead is in the same position as the playhead in the timeline. |
|---|---|
Playhead Position

|
Shows the position of the clip playhead (hour:minute:second:frame number). If you enter a number directly, the clip playhead will move. |
Play/Pause Button


|
It plays or pauses the clip. |
Previous/Next Frame


|
You can view the preview screen frame by frame. When the button is clicked, the clip playhead moves to the previous/next frame. |
Move to Start/Move to End


|
* Clip Mode Button Move the preview playhead to the start and end. |
Previous/Next Clip


|
* Timeline Mode Button Move the preview playhead to the previous clip start position and the next clip start position. |
Volume Control

|
You can adjust the preview volume of the audio. When you click on that button, the volume control bar appears. |
End time

|
It is the end time of the last clip of the timeline. |
3. Timeline Area
It is a workspace for placing and editing media clips.
It is divided into two tracks, [ Video] and [
 Audio], and can be edited using various tools in the Timeline toolbar such as deleting, trimming, doubling speed, adjusting volume, and adding markers.

-
Timeline Toolbar Button Function
Timeline Toolbar Button Function Undo/Redo 

[You can click the [Undo  ] button to go back to the previous step, or click the [Redo
  ] button to run it again.
Delete Clip 
Deletes the selected clip. Cut Clips 
Cut the selected clip from the time the playhead is positioned. Position the playhead on the part you want to cut, and then click the appropriate button. Speed 
You can set the speed of the selected video, audio clip at double speed. Adjust Volume 
You can adjust the volume of selected video and audio clips. Add Marker 
You can add markers to mark important time points. Move the playhead to the desired location in the timeline and click the [Add Marker  ] icon to add the marker.
Export After you have finished editing in the export timeline, you can encode it into a movie. -
Timeline Tracks
Timeline Tracks  Track Video
The selected video clip appears. You can add the video clip again by clicking the [Add  ] button in the clip area.
 Track Audio
The audio clip you added appears. You can add an audio clip by clicking the [Add  ] button in the clip area.
Track Audio On/Off 

You can mute or unmute the sound of the selected track. Fit Zoom 
All clips are automatically scaled to fit the width of the current window. Reduction/Zoom 
You can adjust the scale of the timeline viewer.
It reduces as you get closer to the left and zooms as you get closer to the right.
