GOM CamUser Guide
Preview
1. Preview
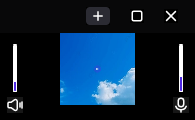
When recording, the Preview pop-up appears in the upper left corner of the screen. You can preview the recording environment before recording.
(If you deselect the Preview pop-up exposure item in Settings > Recording > Other > Run Record, the Preview pop-up will not automatically appear when recording.)
Additionally, click the [Preview  ] button on the recording toolbar to open and close the Preview pop-up.
Effects Settings

|
You can add Effects Settings when recording. When you click the [Effects Settings] button, a settings pop-up will appear, allowing you to add various effects. |
|---|---|
Audio

|
You can check the audio volume of the screen being recorded. You can mute the audio by clicking the [Mute Audio  ] button, and you can unmute the audio by clicking the [Unmute Audio ] button, and you can unmute the audio by clicking the [Unmute Audio  ] button. ] button. |
Microphone

|
Microphone allows you to check the volume of the connected microphone on your PC. You can mute the microphone by clicking the [Mute Microphone  ] button, and you can unmute the microphone by clicking the [Unmute Microphone ] button, and you can unmute the microphone by clicking the [Unmute Microphone  ] button. ] button.If the microphone is disabled  , you can check the microphone device by going to the Settings > Device> Audio Settings >Microphone and change it to the enabled Microphone. , you can check the microphone device by going to the Settings > Device> Audio Settings >Microphone and change it to the enabled Microphone. |
2. Set up the Effects
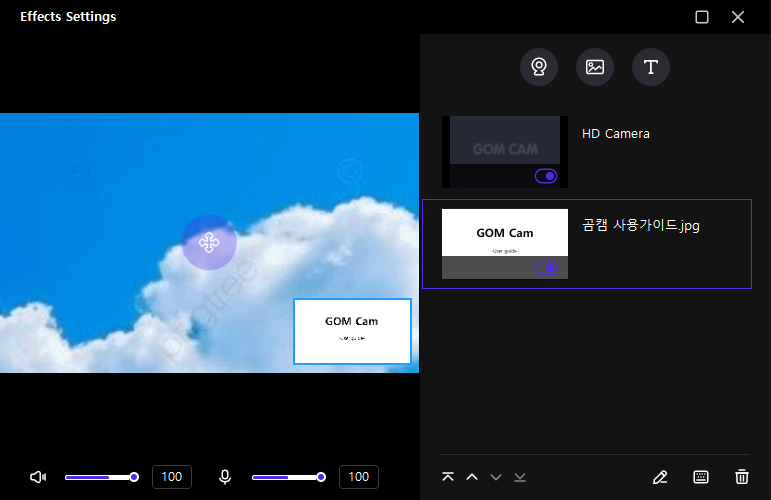
If you click the [Effects Settings  ] button in the Preview pop-up, the Effects Settings pop-up will appear.
[Effects Settings] is a function that allows you to add and set the following effects.
- Adjust audio and microphone volume or mute
- Add additional webcam devices to add camera settings and chroma key synthesis
- Add images inside the recording screen
- Add text and set styles
- Set added webcams, images, and text as hotkeys
The added effect will only appear in the Preview pop-up and the Effects Settings pop-up, and will not appear on the screen you are recording.
Audio

|
You can check and adjust the volume of the audio being recorded. You can mute the audio by clicking the [Mute Audio  ] button, and you can unmute the audio by clicking the [Unmute Audio ] button, and you can unmute the audio by clicking the [Unmute Audio  ] button. ] button. |
|---|---|
Microphone

|
You can check the volume of the microphone being recorded. You can mute the microphone by clicking the [Mute Microphone  ] button, and you can unmute the microphone by clicking the [Unmute Microphone ] button, and you can unmute the microphone by clicking the [Unmute Microphone  ] button. ] button.If the microphone is disabled  , you can check the microphone device by going to the Settings > Device> Audio Settings >Microphone and change it to the enabled Microphone. , you can check the microphone device by going to the Settings > Device> Audio Settings >Microphone and change it to the enabled Microphone. |
Add Webcam

|
After selecting the webcam device, you can set the camera and chroma key effect. |
Add Image

|
You can add an image stored on your PC and set the transparency, position, and size. |
Add Text

|
You can add text and set the font, size, appearance, and other effects. |
Top / Upward

 Downward / Bottom


|
You can set the order in which they appear in the list of effects. |
Edit

|
Edit the properties of the effects. |
Hotkey

|
Set the effect you added as a Hotkey. You can turn on/off with the Hotkey you set to add or remove effects. |
Delete

|
Deletes the selected effects. |
(1) Add Webcam
In the Effects Settings pop-up, click the [Add Webcam  ] button and select your device. You can add a webcam and set effects.
In the Camera tab, you can set the resolution, position, color, and rotate/reverse viewer for webcam footage.
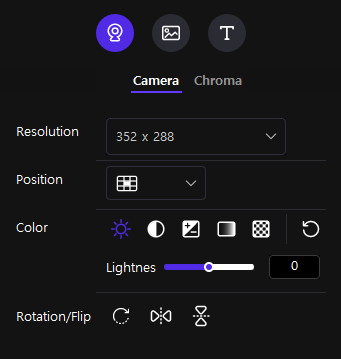
| Resolution | You can set the resolution of the webcam video. Resolution can be changed while recording. |
|---|---|
| Location | Set the location of the webcam screen. Select the desired location from the list of locations or drag the webcam screen with the mouse on the preview screen to adjust the position or size. |
| Color | You can set the color brightness, shadings, contrast, saturation, and opacity. You can click the [Reset  ] button to reset the settings. ] button to reset the settings. |
| Rotate/Reverse | You can rotate or reverse the webcam screen. |
The Chroma Key tab allows you to set chroma key effects on your webcam footage.
Chroma Key is a function that allows you to synthesize an image, video, and etc., on a specific area or color. To use the Chroma Key feature, you need to record or shoot in a single color background that contrasts well with the person being shot. You can set the chroma key effect to erase the background color and blend seamlessly with the screen.
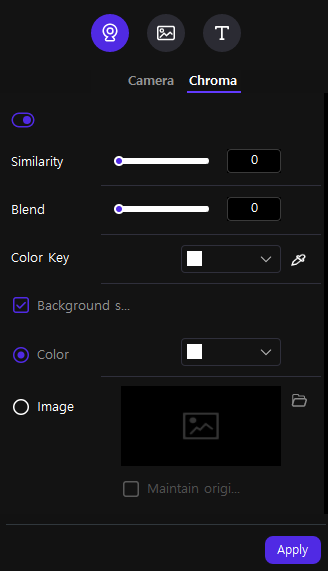
| Chroma Key on/off | You can turn on/off the chroma key function to add or remove it. |
|---|---|
| Similarity | You can set the color similarity with the similarity chroma key. The lower the similarity, the closer the color will be when compared to the set color. |
| Blend | Sets the blending of the recording screen and the webcam to be chromaized. |
| Color Key | Sets the color to be used for the chroma key function. For example, if you select white, the color on the screen that resembles white will be the target of compositing. |
| Background Settings | It allows you to set a color or image to insert into the chroma key area. Here, you can set it to keep the proportions of the original image. |
(2) Add Image
Click the [Add Image  ] button in the effect settings pop-up and select the image file saved on your PC. You can add an image and set the opacity and position.
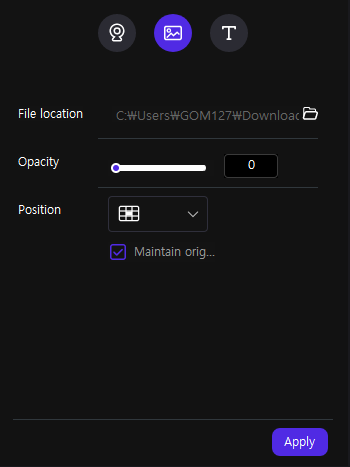
| File Location | You can check the path of the image file you added. Click the [Open Folder  ] button to open the folder. ] button to open the folder. |
|---|---|
| Opacity | It allows you to set the opacity of the image. |
| Location | Set the location of the image you want to add. You can select the desired location from the list of locations or drag the image screen using the mouse from the preview screen to move or resize it. |
| Maintain Original Ratio | When you change the size of an image, you can set it to keep the ratio of the original image. |
(3) Add Text
In the Effects Settings pop-up, you can click the [Add Text  ] button and add text. Enter the text you want to add and set the style. When you add text, you can see it on the preview screen.
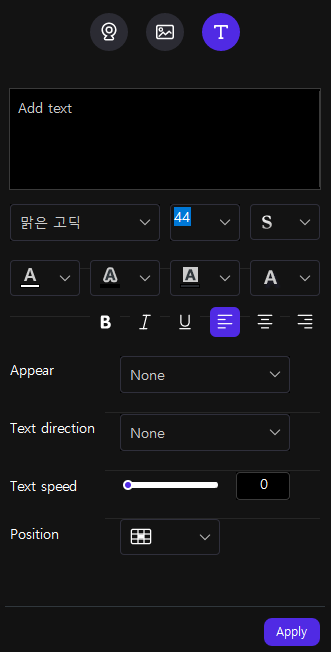
| Text Input Box | When you enter text in the text input box, the typed text appears in the preview area. You can edit the text after you enter it. |
|---|---|
| Text Style | You can set several text styles such as font type, size, alignment, color, and more. |
| Appear | It is an animation effect that sets the text to appear naturally on the recording screen. Try setting different effects to make your text stand out when recording. |
| Text Direction/Speed | It is an animated effect in which text scrolls in motion. You can set the left, right, up, and down text movement direction and speed to give it an effect. |
| Location | It sets the location of the text you want to add. You can select the desired location from the list of locations or drag the text on the preview screen using the mouse to move or resize it. |
