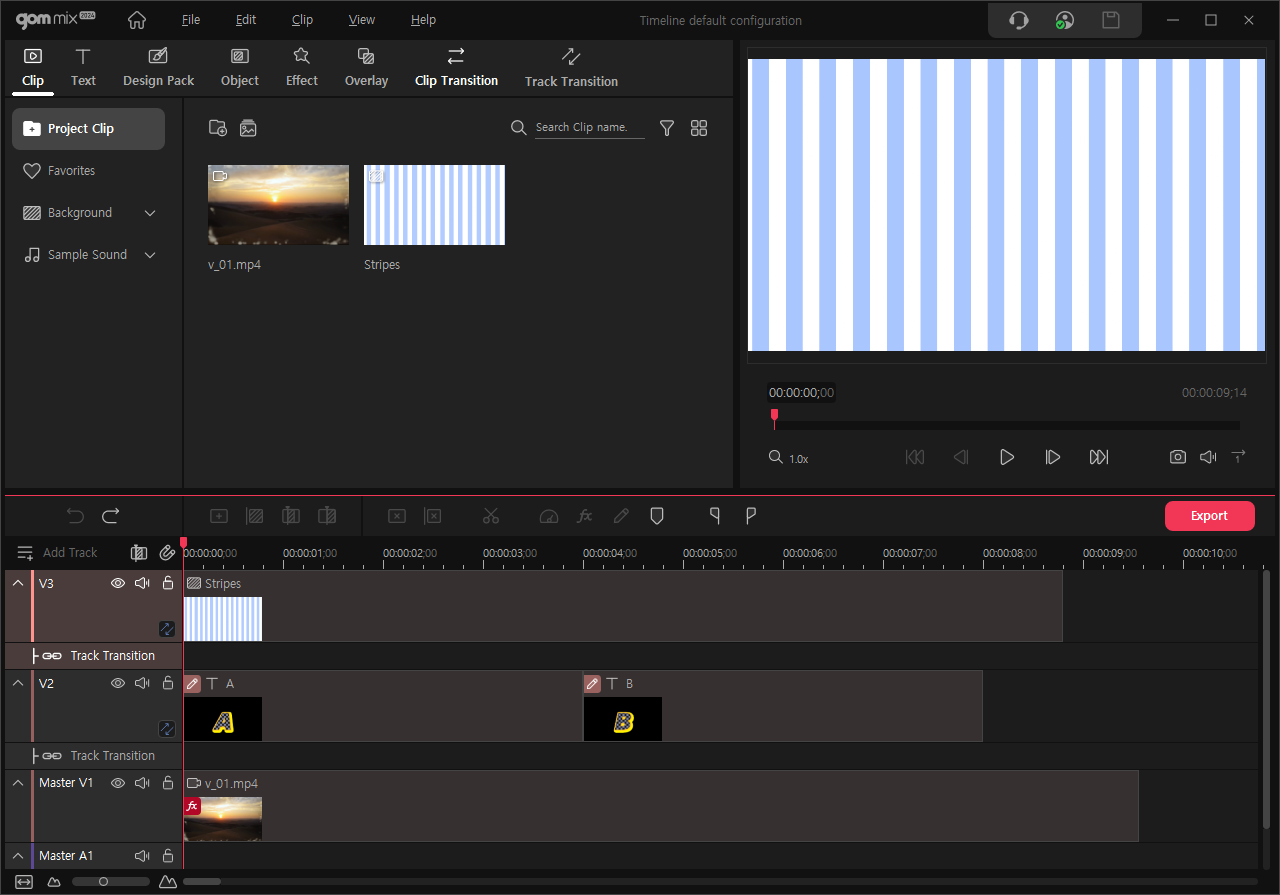
Timeline Panel
Timeline default configuration
This panel lets you place and edit the clips you have uploaded in the Source and Effects Panel list to the track according to each time.
In the timeline work area, you can place the clips according to each time and make a video. GOM Mix uses a layer concept. It is a multi-track type of player that edits clips accumulated on the top track. Video edited in the timeline can be checked in the Preview panel monitor screen. For example, if you change sizes, position, and opacity by applying the [Transform] effect to the top clip, then the clip at the bottom track will be displayed even if there are many clips on it.
This panel is composed of timeline toolbar, track control area, and timeline work panel.
1. Timeline Toolbar
You can insert the clip selected in the project clip list into the timeline panel or delete it. Cut a clip and set the duration/speed/position of a clip. The red line panel shows the time information when moving a clip or changing the length. Use Export to encode video or save the current frame as an image file.
Timeline Toolbar
| Undo |

|
Move back to the previous task phase. |
| Redo |

|
Rerun it when you are back to the previous phase. |
| Add Clip |

|
Add the clip selected in the project clip list to the end of the selected track in the timeline. |
Add Clip afterSelected Clip
| Add Clip afterSelected Clip |

|
Insert the clip selected in the project clip list at the back of the selected clip in the timeline. The clip at the end of the track will be pushed back in time as much as the duration of the clip inserted. If there is no clip selected, then it will be inputted to the end of the track. |
Cut and Add Clip (Insert Clip)
| Cut and Add Clip (Insert Clip) |

|
Insert the clip selected in the project clip list after cutting the clip in the position of the playback head of the timeline. If there is no clip in the playback head, it will be inserted into the position of the playback head and the clip at the end of the track will be pushed by in time as much as the duration of the clip inserted. |
Cut and Add Clip (Overwrite Clip)
| Cut and Add Clip (Overwrite Clip) |

|
Overwrite the position of the playback head with the clip selected in the project clip list. If there is a clip in the position of the playback head, it w. |
Delete Clip (Blank)
| Delete Clip (Blank) |

|
Deletes the selected clip from the timeline. The length of the deleted clip remains blank. The deleted clips are removed only from the timeline and not from the project clip list. Press the  button after placing a pointer on top of the clip in the clip list. button after placing a pointer on top of the clip in the clip list. |
Ripple Delete
| Ripple Delete |

|
Pull the clip selected in the timeline to delete it. The clips in the back will be pulled as much as the length of the deleted clip. |
Slice Clip
| Slice Clip |

|
Cut the clip selected in the timeline from the time point of playback head. The cut clip is divided into two different clips. Cut clips will maintain the same effect properties. If you cut a clip where the keyframe is applied, then the keyframe will be divided at the point of cut time, so please make sure to check the operation of the keyframe. |
Speed, Effect property, Edit Properties, Marker
| Speed |

|
Set the speed of the video/audio clip selected in the timeline. |
| Effect property |

|
Show the effect property applied to the clip selected in the timeline. Delete the effect or change the order or property. If the effect is applied to the clip in the timeline,  is displayed. is displayed. |
| Edit Properties |

|
Activate clips applied in the timeline by clicking an editable text/object clip. Click the Edit icon to immediately move to the Edit screen. |
| Marker |

|
Use markers to mark important time points and clip locations in the timeline. |
Time Information Area
This is the time information displayed when moving a clip. Check the start or end position/time for convenient use in fine movements.
It is displayed when you trim a clip. Show the extended or reduced time compared to the previous clip duration. Also, show the changed duration.


