GOM Mix ProUser Guide
Main Screen
1) Main Screen
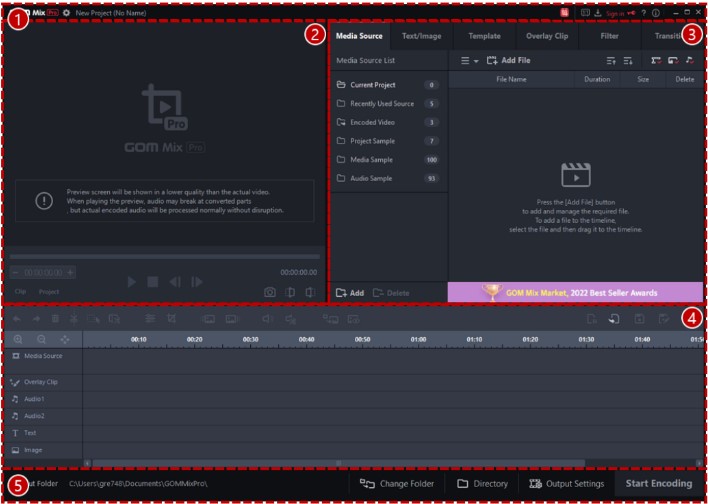
This section explains the home screen navigation and main menu of GOM Mix Pro. GOM Mix Pro consists of largely 5 sections. The location and description for each section is as below.

| Top Bar | You can set the configures of the program, check the main menu, license information, etc. |
|---|---|
| Preview | You can check the video currently being edited. Any media source, text, overlay clips added to the video are displayed. |
| Source and Effects | You can manage list of files to work on, view and add effects including text, images and templates to be included in the media. |
| Timeline | Displays the source or special effects added to edit the video, or allows you to edit the added media source (video, audio etc.) yourself. |
| Encoding | Encodes edited videos into specific video file formats that can be played on PC or smartphones. |
1) Top Bar
Configures the program, lists the main menu and displays license information.

Logo

|
Shows the dropdown menus. Click to view the list of menus. |
|---|---|
Preferences

|
Configures the program. Click to open the Preferences window. |
| Current Project | Shows the name of current project. A new project is displayed as New Project (No Name). |
GOM Mix Market

|
Directs you to the GOM Mix Market page. You can use a variety of contents on a licensed GOM Mix Pro. |
1:1 Support

|
You can move to the 1:1 Support page. |
GOM Downloader

|
Displays the contents you have purchased and downloaded from the GOM Mix Market. |
License Information

|
Shows the license information. |
Help

|
Links to Help on the program. Click to open the online help page |
Tutorial

|
You can check out Tutorial. You can check out the simple usage of GOM Mix Pro one after another. |
- If you are using the GOM Mix Pro Free version, the Sign-in
 icon is displayed in the License Information section. Click the Sign in to register the license.
2) Preview
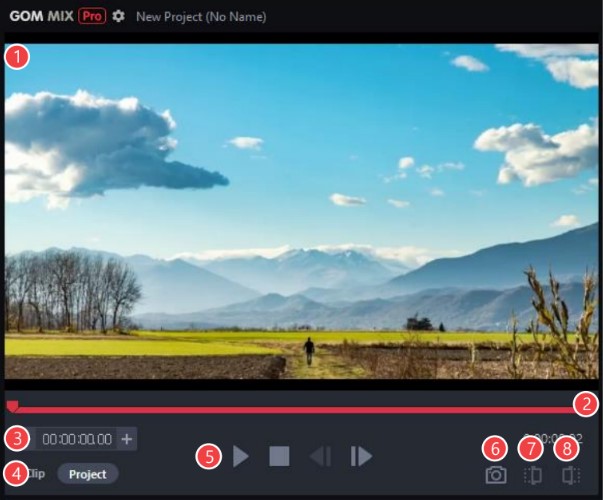
Renders the video currently being edited. Any media source, text and overlay clip added to the video are displayed.

| Preview Screen | Shows the video currently being edited and all the effects added are played. Use the playback controls to adjust the video. |
|---|---|
| Preview Slider | Navigates the location in the video images to play. Move the slider left and right to change the position. |
| Set Playback Position | You can directly enter a playback time of the video to preview.
|
| Clip/Project Mode | Sets what to play in the preview.
|
| Playback Controls | Controls the video in the preview. Select from Play/Pause, Stop, Fast forward/Rewind for 1 second.
|
Screenshot

|
Captures the image currently being displayed in the preview screen. |
Mark In

|
Sets the start position of the video. The part of the video before the Mark in position will not be played. |
Mark Out

|
Sets the end position of the video. The part of the video after the Mark out position will not be played. |
3) Sources & Effects
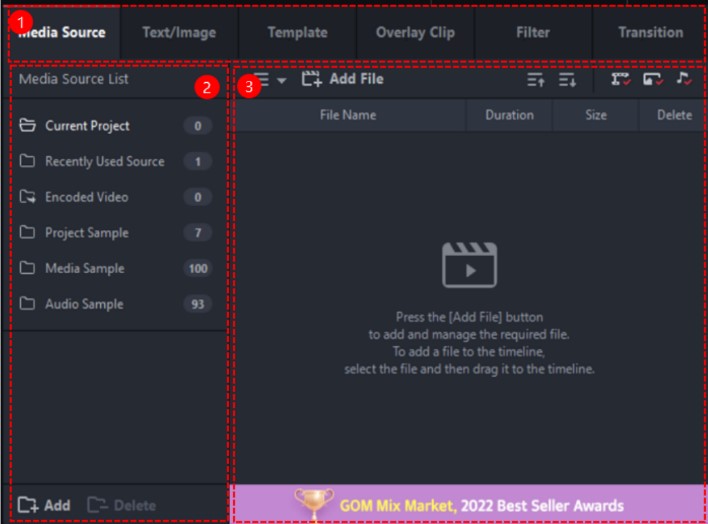
You can add media sources including video clips, background images and audio files for video editing. Also, you can apply text or color filters, video transitions and other special effects to the video.

| Menu Tab | List of menus for video editing are displayed in the tabs.
|
|---|---|
| List of Sources & Effects | Lists sources and effects included in the selected tab. Click a folder in the directory tree to view sources and effects included in the folder. |
| Listing Pane | Lists the files in the selected folder from the sources & effects pane. |
4) Timeline Panel
Shows and edits media sources (video clips and audio) and special effects added to the video.

| Edit Source icons | Edit the video clip or audio added to the media source track. |
|---|---|
| Project Manager icons | Save the current project or create a new project. |
| Media Track | Shows media sources (video clips and background images) added to the current project. Displays the size and format of the media sources. |
| Overlay Track | Shows overlay clips added to the current project. |
| Audio Track | Shows audio sources added to the current project. |
| Text Track | Shows texts added to the current project. |
| Image Track | Shows images added to the current project. |
5) Encoder
Compresses and converts the video to a best format to play on PC or smartphone.

| Output Folder | Shows the location where the encoded video file is saved. |
|---|---|
| Change Folder | Changes the location where the encoded file is saved. |
| Directory | Opens the folder specified in Output Folder. |
| Output settings | Configure settings for encoding. |
| Start encoding | Starts encoding all of edited video files. |

 ,
,  icons to change the time.
 ): Plays the video. Once the video starts playing, the button changes to
  )
) ): Stops the video.
 ): Fast forwards the video for 1 second.
 ): Rewinds the video for 1 second.